|
Administrators
Developers
Articles
Cookbook
edit
|
Installing the Porcupine CGI Connector on IIS
Administrators.InstallCGIConnectorIIS History
Hide minor edits - Show changes to markup
December 03, 2006, at 11:17 PM
by Tassos Koutsovassilis -
Changed lines 14-15 from:
- Open a browser. In the address bar type "http://localhost/porcupine.exe". If you have installed Porcupine before the CGI connector then you should see the Porcupine login dialog. Otherwise if you see the following message then you have installed the connector succefully:
to:
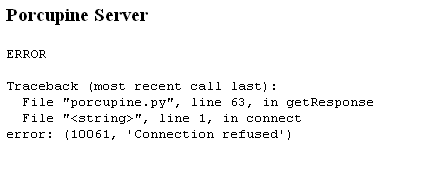
- Open a browser. In the address bar type "http://localhost/porcupine.exe". If you have installed Porcupine before the CGI connector then you should see the Porcupine login dialog. Otherwise if you see the following message then you have installed the connector successfully:
December 03, 2006, at 11:15 PM
by Tassos Koutsovassilis -
Changed lines 14-15 from:
- Open a browser. In the address bar type "http://localhost/porcupine.exe". If you have installed Porcupine before the CGI connector then you should see the Porcupine login dialog. Otherwise if you see the following message then you now that you have installed the connector succefully:
to:
- Open a browser. In the address bar type "http://localhost/porcupine.exe". If you have installed Porcupine before the CGI connector then you should see the Porcupine login dialog. Otherwise if you see the following message then you have installed the connector succefully:
December 03, 2006, at 11:14 PM
by Tassos Koutsovassilis -
Changed lines 10-12 from:
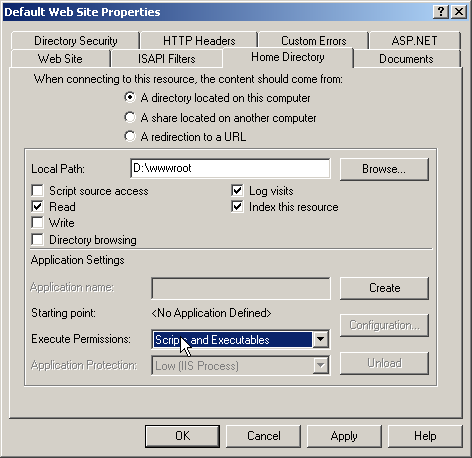
- Activate the "Home Directory" tab, locate the "Execute permissions" setting and select "Scripts and Executables".
to:
- Activate the "Home Directory" tab, locate the "Execute permissions" setting and select "Scripts and Executables". Then close the dialog by pressing the "OK" button.
- Open a browser. In the address bar type "http://localhost/porcupine.exe". If you have installed Porcupine before the CGI connector then you should see the Porcupine login dialog. Otherwise if you see the following message then you now that you have installed the connector succefully:
December 03, 2006, at 11:02 PM
by Tassos Koutsovassilis -
Changed lines 3-6 from:
- First download the latest CGI connector from Porcupine Connectors download page.
- Unzip the archive inside the IIS root folder (this is usually the "C:\inetpub\wwwroot" folder).
- Open the IIS management console, by opening the Windows control panel and selecting "Administrative Tools" and then "Internet Information Services".
- Select the default web site and open its properties dialog.
to:
- First download the latest CGI connector from Porcupine Connectors download page.
- Unzip the archive inside the IIS root folder (this is usually the "C:\inetpub\wwwroot" folder).
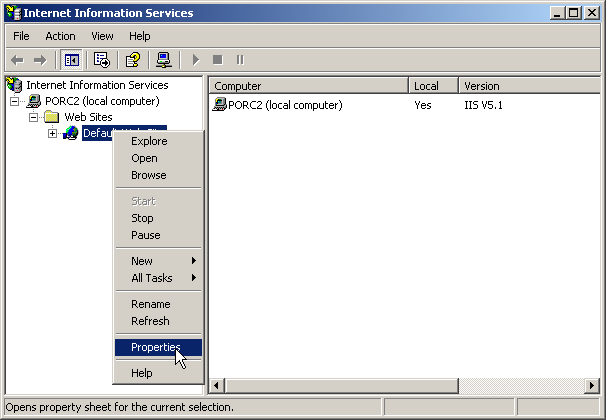
- Open the IIS management console, by opening the Windows control panel and selecting "Administrative Tools" and then "Internet Information Services".
- Select the default web site and open its properties dialog.
Changed lines 9-11 from:
- Activate the "Home Directory" tab, locate the "Execute permissions" setting and select "Scripts and Executables".
to:
- Activate the "Home Directory" tab, locate the "Execute permissions" setting and select "Scripts and Executables".
December 03, 2006, at 11:01 PM
by Tassos Koutsovassilis -
Deleted line 6:
Deleted line 7:
Deleted line 8:
December 03, 2006, at 11:00 PM
by Tassos Koutsovassilis -
Added lines 7-9:
December 03, 2006, at 10:56 PM
by Tassos Koutsovassilis -
Changed line 4 from:
- Unzip the archive inside the IIS root folder (this is usually the "C:\inetpub\wwwroot" folder).
to:
- Unzip the archive inside the IIS root folder (this is usually the "C:\inetpub\wwwroot" folder).
December 03, 2006, at 10:55 PM
by Tassos Koutsovassilis -
Changed lines 3-8 from:
- First download the latest CGI connector from Porcupine Connectors download page.
- Unzip the archive inside the IIS root folder (this is usually the "C:\inetpub\wwwroot" folder).
- Open the IIS management console.
- Select the default web site and open its properties dialog.
- Activate the "Home Directory" tab, locate the "Execute permissions" setting and select "Scripts and Executables".
to:
- First download the latest CGI connector from Porcupine Connectors download page.
- Unzip the archive inside the IIS root folder (this is usually the "C:\inetpub\wwwroot" folder).
- Open the IIS management console, by opening the Windows control panel and selecting "Administrative Tools" and then "Internet Information Services".
- Select the default web site and open its properties dialog.
- Activate the "Home Directory" tab, locate the "Execute permissions" setting and select "Scripts and Executables".
December 03, 2006, at 10:51 PM
by Tassos Koutsovassilis -
Changed lines 5-9 from:
- Open the IIS management console by selecting
to:
- Open the IIS management console.
- Select the default web site and open its properties dialog.
- Activate the "Home Directory" tab, locate the "Execute permissions" setting and select "Scripts and Executables".
November 26, 2006, at 01:00 PM
by Tassos Koutsovassilis -
Changed lines 1-2 from:
to:
(:title Installing the Porcupine CGI Connector on IIS :)
November 26, 2006, at 01:00 PM
by Tassos Koutsovassilis -
Added lines 1-2:
November 26, 2006, at 12:57 PM
by Tassos Koutsovassilis -
Changed lines 1-3 from:
First download the latest CGI connector from Porcupine Connectors download page.
to:
- First download the latest CGI connector from Porcupine Connectors download page.
- Unzip the archive inside the IIS root folder (this is usually the "C:\inetpub\wwwroot" folder).
- Open the IIS management console by selecting
November 26, 2006, at 12:12 PM
by Tassos Koutsovassilis -
Changed line 1 from:
to:
First download the latest CGI connector from Porcupine Connectors download page.
November 26, 2006, at 12:11 PM
by Tassos Koutsovassilis -
Added line 1:
|