- Download the latest CGI connector from Porcupine Connectors download page.
- Unzip the archive inside the Apache root folder (this is usually the "C:\Program Files\Apache Group\Apache2\htdocs" folder).
- Open the "httpd.ini" Apache configuration file with a text editor. This file is located inside the "conf" folder of your Apache installation root.
- Search the document for the "ScriptAlias?" directives.
- Append the following line at the end of these kind of directives. If you have installed Apache in a different folder, the modify the full path to porcupine.exe accordingly:
ScriptAlias /porcupine.exe "C:\Program Files\Apache Group\Apache2\htdocs\porcupine.exe"
- Save the "httpd.ini" file and restart the Apache service, for the new settings to take effect.
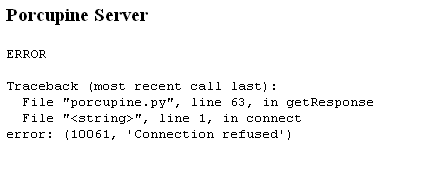
- Open a browser. In the address bar type "http://localhost/porcupine.exe". If you have installed Porcupine before the CGI connector then you should see the Porcupine login dialog. Otherwise if you see the following message then you have installed the connector successfully: